PMP Integration in ePrescribing
The Prescription Drug Monitoring Program (PMP) enhances patient safety by providing healthcare providers with quick access to controlled substance histories, helping prevent prescription misuse, and ensuring compliance with state regulations. In this integration, providers can view PMP data directly within the ePrescribing workflow, offering insights on patient risk factors from PMP Gateway or NarxCare. By making this data readily available, providers can make informed, safe decisions about controlled prescriptions efficiently and accurately.
Steps for Prescribing Providers to Add and Send Controlled Prescriptions with Automatic PMP Integration
This guide provides instructions for healthcare providers on using the Automatic PMP feature, which seamlessly queries the PMP database whenever a controlled substance is prescribed, ensuring state compliance and streamlined workflows.
![]()
Navigate to https://ehr.wrshealth.com/wrsadmin_new.
![]()
1. Create a controlled prescription in the Medications 2.0 page.
2. From the Current Note Prescription list, click “Send” (or select the send/envelope icon) to initiate the submission.

3. The system opens the “Send Prescription” window, displaying available PMP data including Narcotics, Stimulants, Sedatives, and Overdose scores which you can review prior to finalizing the prescription.

4. Click the VIEW PDMP REPORT to check and review the following:
- Access Full PMP Report (if needed): For a comprehensive review, and detailed PMP report.
- Check NarxCare Alerts (if applicable): If NarxCare is enabled, review highlighted risk factors (e.g., opioid use, multiple prescribers) as indicated by visual alerts or icons for enhanced safety checks.

5. To finalize for sending, tick the PDMP Data review completed checkbox, then click the APPROVE & SIGN button, this action will trigger the MD Toolbox Signoff window. A confirmation message will be displayed after the prescription in View Note.

Note:
- Practice users must have the necessary permissions enabled to create controlled prescriptions and access Electronic Prescriptions for Controlled Substances (EPCS) features.
- The PMP feature must also be activated for the practice.
- When practice users view notes in the “View Note > Prescriptions” section, they will see the confirmation message, “Prescriber checked PMP database for this patient” displayed after all prescriptions.

How to Review and Approve PMP Data in Task Queue for Controlled Prescriptions
When an ancillary staff create a controlled prescription and assign it to your task queue, relevant PMP data will be readily available for review. This allows you to make informed decisions on whether to proceed with prescribing the controlled substance.
![]()
Login to your account > https://ehr.wrshealth.com/wrsadmin_new.
![]()
1. Navigate to your task queue page, click Message > navigate to Task > Active.

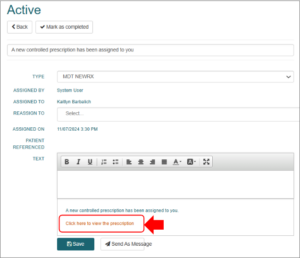
2. Locate the new controlled prescription task that has been assigned to you.
3. Click the task to open and view its details.
4. Click on the link labeled “Click here to view the prescription”, the system will open a window, where the retrieved PMP data is displayed alongside the prescription details.


5. Review the PMP details displayed on the page, confirm that it includes:
-
- Patient name and address
- Medication name and dosage
- Prescribing provider
- Fill dates
- Pharmacy details
6. Click the VIEW PMP REPORT to check and review the following:
-
-
- Access Full PMP Report (if needed): For a comprehensive review, and detailed PMP report.
- Check NarxCare Alerts (if applicable): If NarxCare is enabled, review highlighted risk factors (e.g., opioid use, multiple prescribers) as indicated by visual alerts or icons for enhanced safety checks.
-

7. To finalize the review, tick the PMP Data review completed, then click the APPROVE & SIGN button, this will trigger the MDToolbox Sign Off window.

8. The prescribing provider must be able to electronically Sign & Send the controlled prescription after entering the correct token password and security code.
Note: When practice users view notes in the “View Note > Prescriptions” section, they will see the confirmation message, “Prescriber checked PMP database for this patient,” displayed after all prescriptions.
How to Access PMP Queries in Clinical Logs
Each PMP query and response is logged as a clinical entry in the clinical logs interface. This log helps maintain a complete record of prescription-related PMP activities.
![]()
Login to practice admin and navigate to Clinical Logs interface: Administration > Logs > Clinical.
![]()
1. From the Clinical Logs page, use the available filters to refine your search for specific PMP log entries.

2. Each log entry will display the relevant information captured during the PMP query. This enables you to verify and document PMP-related actions effectively:
The log entry captures the following details:
- Date and time of the PMP query.
- Provider’s name and ID who initiated the query.
- Patient’s name and ID for whom the query was made.
- Note ID associated with the query
- Prescription name associated with the query
- Query result status (e.g., successful, error, or no data found).

3. You may click the VIEW to review further details.

Visit our FAQ page to find answers to common questions and helpful information.

Still no luck? We can help!
Contact us and we'll get back to you as soon as possible.
Submit a Request