Delegated Prescriptions Queue Guide
for Non-Controlled Prescriptions
The Delegated Prescriptions Queue streamlines prescription management by enabling ancillary staff and mid-level providers to draft medications while giving supervising providers full oversight to review and send non-controlled prescriptions with ease.
With bulk actions, comprehensive prescription details, and a flexible workflow, this intuitive platform helps you reduce errors, improve compliance, and enhance patient safety. Keep your practice running efficiently, eliminate bottlenecks, and ensure every prescription is reviewed and sent seamlessly.
Setting up Supervising Provider for Ancillary Staff or Mid-Level Providers
![]()
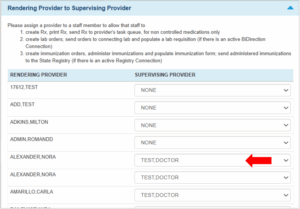
- Log in as a user with administrator permissions
- Navigate to Administration > EMR Setup > Supervising Providers
- The page “Rendering Provider to Supervising Provider“ will open
- From the “Rendering Provider” list, locate the ancillary staff member or mid-level provider you want to assign.
- From the dropdown menu, select the appropriate supervising provider.
- Click Make Changes button to save and confirm the assignment.
Prescription Delegation Workflow
For Ancillary Staff and Mid-Level Providers
![]()
1. Draft the Prescription
○ Navigate to the Medications / Medications 2.0 page in the patient chart.
○ Create the prescription as usual, including:
-
-
- Medication name
- Dose and instructions
-
○ Ensure all necessary clinical details and notes are included.
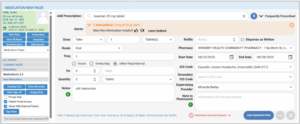
2. Delegate the Prescription to a Supervising Provider
• Confirm the Supervising Provider for Delegation:
a. Regular Delegation:
If the ancillary staff or mid-level provider has already been assigned to a Supervising Provider, that provider will appear pre-selected in the “Supervising Provider” dropdown. This ensures quicker delegation for routine workflows.
See Setting up Supervising Provider steps for more details.
b. One-Time Delegation or Reassignment:
If the prescription needs to be sent to a different Supervising Provider, the user can manually select or reassign from the “Supervising Provider” dropdown on the Add Prescription entry page.
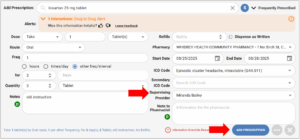
• Click Add Prescription to save. The medication will appear in the Current Note Prescriptions list.
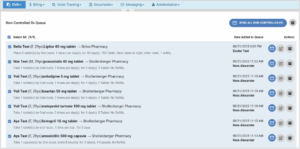
3. Sending the Prescriptions to the Supervising Provider’s Controlled Rx Queue
• From the Current Note Prescriptions list, select the medications to delegate.
• Review them on the Prescription Preview page, then click Send to forward to the Supervising Provider.
• Once submitted:
a. The prescription appears in the supervising provider’s Delegated Prescriptions Queue.
b. The system records the delegation timestamp and the identity of the delegating provider.
For more information on prescription workflow options, please refer to this guide.
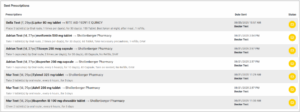
Managing Non-Controlled Prescriptions Queue for Supervising Provider
Step 1. Access the Non-Controlled Prescription Queue
- Log in to the EHR.
- Navigate to: EMR > Non-Controlled RX Queue
- You will be directed to the Non-Controlled RX Queue page, which displays all pending prescriptions awaiting review.
Note that there are three other sections available in the page:
- Unsent Prescriptions: List of all prescriptions added to the queue.
- Sent Prescriptions: List of all prescriptions sent to the pharmacy.
- Archived Prescriptions: List of all prescriptions moved to the archive.
All the Prescriptions lists are arranged with the most recent items at the top, so you can quickly access the latest prescriptions.
Step 2. Reviewing the Queue
Each record in the queue displays:
- Patient information & prescription details
- Timestamp & delegating staff/provider
- Available actions:
-
 Send Prescription – trigger the sending to pharmacy
  Modify Prescription – review, update, or reassign
 Archive Prescription – move prescription to archive
-
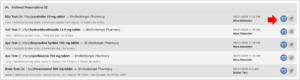
Step 3. Select Prescriptions to Send
Note: For a smoother workflow, all unsent prescriptions in the queue are pre-selected.
- Bulk Send:
- Tick the checkboxes for multiple prescriptions (or use Select All at the top).
- Click the Send Non-Controlled button at the top right of the list.
- Individual Send:
- Click the Send Prescription icon on a specific row.
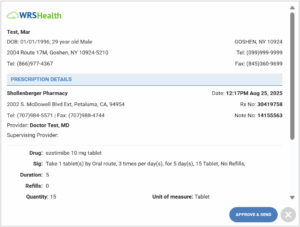
Step 4. Review Before Sending
- A Prescription View page will appear before sending, showing all selected prescriptions.

- Providers may double-check prescription details.
- Click Approve and Send when ready.
Step 5. Confirmation of Sent Prescriptions
Prescriptions are transmitted to the pharmacy and moved to the Sent Prescriptions list.
💡 Visual Status Indicator:
 Sent Prescriptions. Indicates that the electronic sending is in progress.
-
 Received. Indicates that the pharmacy has received the request.
  Failed. A red alert symbol indicates that sending has failed.
 Canceled. The provider / sender cancels the sending of prescriptions.
Edit Prescriptions Steps
If corrections are needed, click ![]() Modify.
Modify.
- In the Edit Prescriptions Page, providers can review and update any information in the SIG (i.e. adjust dosage, frequency, choose pharmacy, provide notes)
- Click Save to apply the changes.
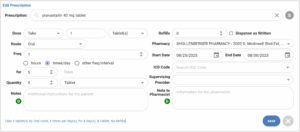
- Providers can also reassign the prescription to another supervising provider
- Simply select a new Supervising Provider from the dropdown.
- Click Save.
- The prescription will be removed from the current queue and routed to the new provider’s Delegated RX Queue.
Archive Prescriptions
Prescription records from the queue can be moved to Archived, so it can later be reviewed, modified and sent when needed.
- Bulk Archive
- Select multiple prescriptions by ticking the checkboxes (or Select All at the top).
- Click Archive.
- Individual Archive
- Locate the prescription row.
- Click Archive for that specific prescription.
The selected prescriptions are automatically moved to the Archived Prescriptions list.
Send Prescriptions through Archives
The items in the Archived sections can be modified to create and send prescriptions.
1. Locate the prescription from the Archived Prescriptions list, click ![]() Modify.
Modify.
2. Review and update SIG, then Save.
3. Click ![]() Send, for final review, then click the Approve & Send button.
Send, for final review, then click the Approve & Send button.
4. The prescriptions will be moved to the Sent Prescriptions List.
Checking of Logs
To quickly view all actions made in the patient’s prescriptions:
• Go to Administration > Medication Setup > Medication Management.
• Alternatively, this can also be accessed from EMR All Notes > Medication Transactions
• Or, to view directly inside the note:
1. Search for the patient and navigate to the patient’s chart in the EHR.
2. Go to Medications (or Medications 2.0) within the chart.
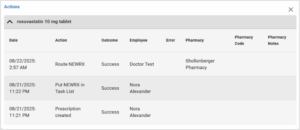
3. From the prescription list, right-click on the desired prescription, select View All Actions from the menu.
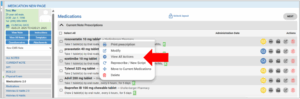
4. All actions, edits, and prescription details can be viewed here for review or auditing purposes.
• Another way to view prescription logs is by navigating to Administration > Logs > Clinical Logs in the EHR.

Still no luck? We can help!
Contact us and we'll get back to you as soon as possible.
Submit a Request