Managing Recurring Payments in Your Practice
This guide provides step-by-step instructions for creating, viewing, editing, and canceling recurring payment schedules within the system. Users will learn how to navigate the dashboard, configure new recurring payment schedules, and manage existing ones efficiently.
NOTES
This feature is only available for GPI-enabled practices.
Setting Up Recurring Payments for a Patient
Recurring credit card payments can be scheduled either directly from a patient’s account or through the check-in command. To get started, follow the steps below:
![]()
Step 1: Open the Patient Account Page
- On the Today’s Appointment List hover over the patient’s name and select Check-in from the hover box or
- Right-click on the patient’s name and select Patient Account.

Step 2: Choose Recurring Payment
- In the patient’s account page, locate the Payment Type dropdown.
- Select Credit Card > Recurring. A Credit Card Details Form will appear.

Step 3: Add or Select Credit Card Information
- If no credit card is on file:
- A Credit Card Details modal will appear.
- Enter the patient’s card and billing details.
- Click Submit to save the details.
- If a card is already saved:
- Use the dropdown to select the stored card.
- Click Next to proceed.

Step 4: Fill Out the New Recurring Payment Form
- Enter the following:
- Amount to be charged
- Frequency (e.g., weekly, monthly)
- Start Date
- Optional: Add notes
- Optional: Set an End Date, or select No End Date

Step 5: Preview the Recurring Schedule
- Click Preview to review the details:
- The right panel shows a summary with an end date and total amount.
- The left panel shows the option with no end date and its projected total.
- Review the information carefully.

Step 6: Submit the Schedule
- Click Submit to finalize the recurring payment.
- A confirmation message will appear indicating success.

Viewing and Managing Existing Payment Schedules
![]()
Navigate to Billing > Recurring Payments. This will open the dashboard where all recurring payments are listed and managed.
At the top of the dashboard, you’ll find an overview of:
- Total Active Payment Schedules
- Total Completed Payment Schedules
- Total Cancelled Payment Schedules
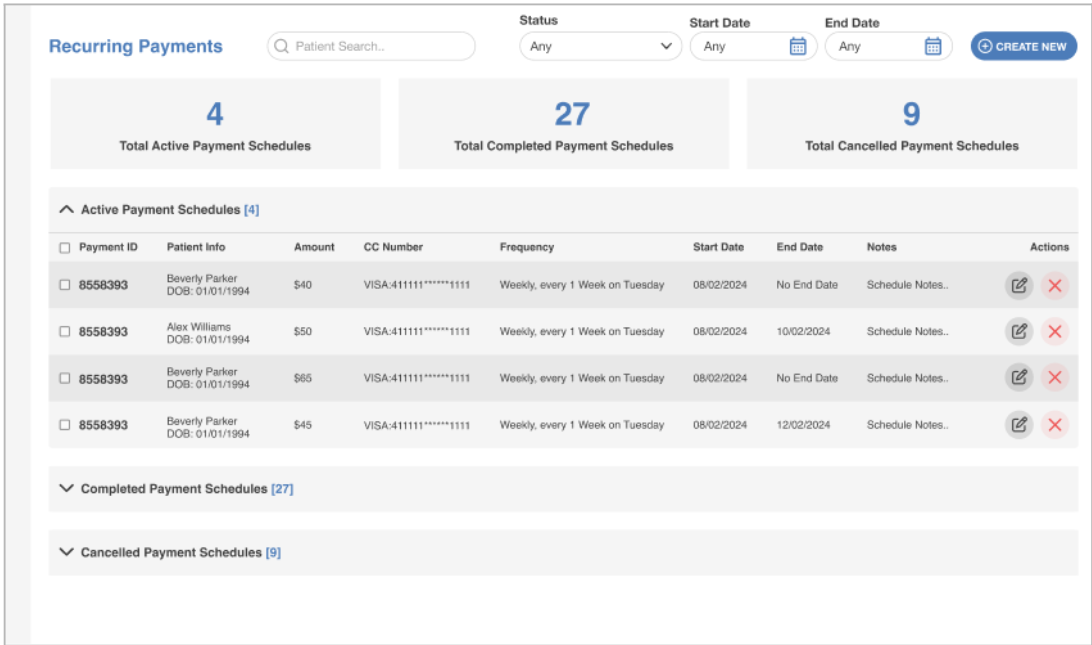
Searching and Filtering Payment Schedules
1. Use the search box at the top of the page to find payment schedules by patient name.
2. Apply filters such as Status, Start Date, or End Date to refine your results further.

Editing a Payment Schedule
1. To edit, locate the patient record under Active Payment Schedules and click the Edit button.
2. The Edit Recurring Payment Schedule form will open, allowing you to make necessary changes.
NOTES
Modifications are only permitted if the first scheduled credit has not yet reached its due date.

3. Click Preview to review your changes, then select Submit to apply and save the updated schedule.

Cancelling a Payment Schedule
1. To cancel a schedule, click the Cancel button associated with the entry.
2. A confirmation prompt will appear—confirm to proceed with the cancellation.

Viewing Activity Logs
To review the history of changes and actions taken on a payment schedule, click the Activity Log button for that entry.


Still no luck? We can help!
Contact us and we'll get back to you as soon as possible.
Submit a Request