Overview
The WRS Health Medications Version 2.0 introduces an enhanced Medications page designed to deliver an optimized user experience and improved usability. This updated version allows you to efficiently search for, view, and manage prescriptions, allergies, and patient medication history, streamlining workflows and saving valuable time.
The new page has sections that you can arrange according to your preference, providing a more convenient and efficient way to view patient medication details. This enhancement streamlines your medication management process, saving time and improving usability.
This document serves as a guide to help you navigate and utilize the updated Medications 2.0 page effectively, integrating it seamlessly into your workflow.
The Medications 2.0 Page

The Medications 2.0 page features an enhanced interface designed to streamline and simplify your workflow. You can organize and arrange sections to suit your preferences, making it easier to manage tasks. With this updated page, you can conveniently view and add prescriptions, record allergies, access medication history, and archive medication and allergy information effortlessly.
Open
To open the Medications 2.0 page, you can do either of the following:
From Today’s Appt List,
- Hover over the patient’s name > click Create New Note > select the applicable note template > select Medications 2.0.
- Hover over the patient’s name > click View Most Recent Note > select the applicable note template > select Medications 2.0.
From Patient Search,
- Search for patient’s name > right-click on the patient’s name > Create New Note > select the applicable note template > Medications 2.0.
- Search for patient’s name> right-click on the patient’s name > View Most Recent Note > select the applicable note template > Medications 2.0.

Organize
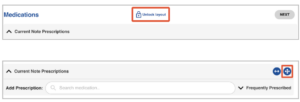
You can organize and arrange the sections of Medications 2.0 according to your preference. To rearrange the sections, click Unlock Layout > click the Drag-and-Drop icon > drag and drop the applicable sections to the preferred position.
Collapse, Expand, and Extend
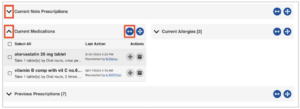
You can also collapse, expand, and extend each section. To do this, click the Collapse and Expand arrows, or the Extend buttons respectively.
A. Current Note Prescriptions
Newly created prescriptions are listed in this section along with details about the medication such as drug name, dosage, pharmacy, and SIG.
Other information includes:

• Educational Material icon. Hover over the icon to display the summary including the date and timestamp, name of the provider or user who added the prescription, NDC, and RXNorm codes.
Click to open the default or configured educational resource of the practice.

• Drug Indicator icon. The Drug Indicator icon is only displayed if the drug is a controlled substance.
The symbol is either C-I, C-II, C-III, C-IV, and C-V to represent schedule levels and substance levels.

• View on Google Maps. When you hover over the pharmacy name, the View on Google Maps button appears. Click the pharmacy name to view the pharmacy location on Google Maps.

• Send Prescription icon. Allows you to send note prescriptions electronically to the patient’s preferred pharmacy.
• Print icon. Click to print copies of prescriptions.
• Modify icon. Click to modify prescriptions.
• Delete icon. Click to delete prescriptions.

• Add Prescription icon. The Add Prescription box is a smart search box where you can enter the name of the drug to search for and prescribe a medication.
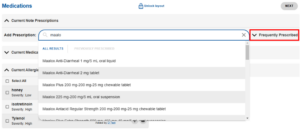
• Frequently Prescribed. Click Frequently Prescribed to view the top 10-20 prescriptions that the current user has frequently prescribed.
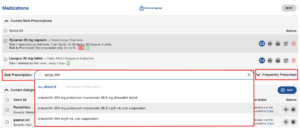
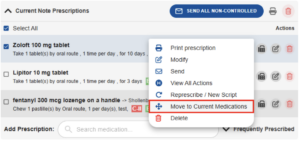
Note: Right-click on the medication to view other options such as View All Actions, Represcribe, Modify, Print, etc.

Medication Settings
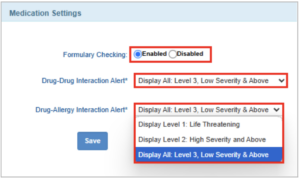
To ensure patient access and avoid coverage issues before prescribing medications, it is important to set up your EHRs formulary checking.
Alongside formulary checking, drug-allergy and drug-drug interaction alerts help you optimize the medication regimen for your patients, improve their adherence, and reduce risk of medication-related harm.
To set up your formulary checking and interaction settings, go to:
1. Go to Administration, click Medication Setup, and then select Medication Settings.
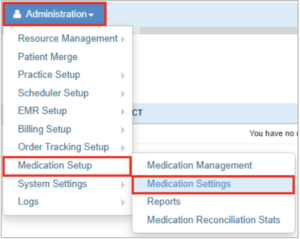
2. In the Medication Settings page, you can select whether to enable or disable your EHR’s formulary checking.
You can also select the level of severity for the drug-drug and drug-allergy interaction alerts.
Add a Prescription
1. In the patient’s note, click Medications 2.0.
2. Go to the Current Note Prescriptions section.
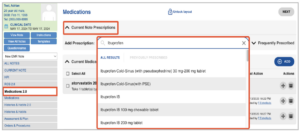
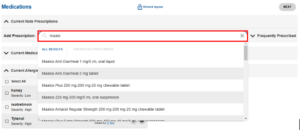
3. Enter the drug name in the Add Prescription box.
Note: The Add Prescription box uses a Smart Search feature which automatically lists all the results in the All Results lists.
The result also contains different drug variants with the applicable dosages and recommended SIG.
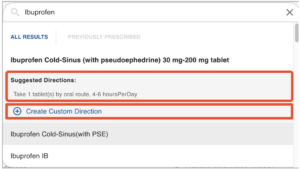
From the results list, you can also select between the following:
- Suggested Directions. This suggested direction is based on the patient’s previously prescribed SIG for the specific drug.
- Create Custom Direction. Customize the frequency, route of administration, and any special instructions for the patient.
Note: You can click Frequently Prescribed and view the top 10-20 drugs that you frequently prescribe.

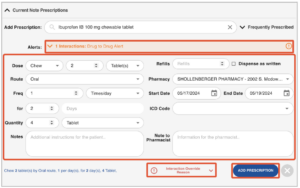
4. After selecting the drug:
I. Check the alerts if there are any
II. Enter the SIG details or prescription information in the prescription form
III. Add the overriding reason if applicable.
IV. Click ADD PRESCRIPTION.
The list of added prescriptions for the patient is now listed in the Current Note Prescriptions section.
Note: If you are an ancillary staff, it will be added to the provider’s task list which they can view through their Inbox > Tasks > Active Tasks.
Note:
• The prescription form can be auto-filled based on the medication note template.
• The Pharmacy is automatically selected based on the data in Patient Management.
• Ensure that the pharmacy is selected from the database and not manually entered. It is advised to use the zip code filter and then, click the SEARCH PHARMACIES button. Only pharmacies registered with Surescripts will populate the database.

• The SEARCH PHARMACIES opens the Retail Pharmacy Search window where you can search for the applicable pharmacy where you will send the prescription based on your location. You can also view if the pharmacy does not allow electronic cancellation of prescription requests.

• The ICD Code selected will appear on your Assessment and Plan page along with the medication as your plan.
• The Quantity box automatically displays the total calculated value based on the Dose, Frequency and Duration.
• The Supervising Provider list does not allow you to view the entire list unless you are assigned with a Supervising Provider.
Admnister a Medication
To record medication administration directly into the patient chart, follow these steps:
1. In the patient’s note, click Medications 2.0.
2. Go to the Current Note Prescriptions section.
3. Enter the drug name in the Add Prescription box.
You can also select from the Frequently Prescribed list if the medication is a frequently prescribed drug.
4. Select from the list of results the medication that you will administer.
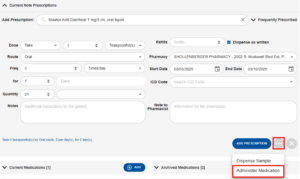
5. Enter the necessary SIG details, notes, and pharmacy details.
6. Click the button to the right of Add Prescription, and select Administer Medication.
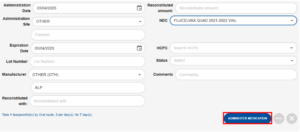
7. Enter the other administration records such as:
- Date (Administration, Expiration)
- Administration Site
- Lot Number
- Manufacturer
- Reconstituted with
- Reconstituted Amount
- NDC
- HCPC
- Status
- Comments
8. Click Administer Medication.
The system logs the administration in the patient’s chart with a timestamp and updates the relevant record in the list.
Dispense a Sample
To dispense a sample, follow these steps:
1. In the patient’s note, click Medications 2.0.
2. Go to the Current Note Prescriptions section.
3. Enter the drug name in the Add Prescription box.
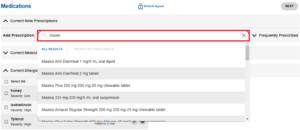
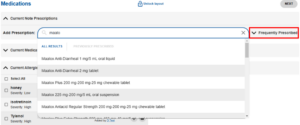
You can also select from the Frequently Prescribed list if the medication is a frequently prescribed drug.
4. Select from the list of results the medication that you will administer.
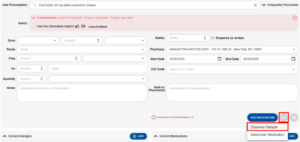
5. Enter the necessary SIG details, notes, and pharmacy details.
6. Click the button to the right of Add Prescription, and select Dispense a Sample.
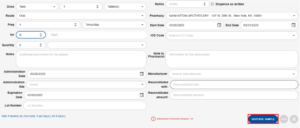
7. Enter the other administration records such as:
- Date (Administration, Expiration)
- Administration Site
- Lot Number
- Manufacturer
- Reconstituted with
- Reconstituted Amount
- NDC
- HCPC
- Status
- Comments
8. Click Dispense Sample.
The system logs the administration in the patient’s chart with a timestamp and updates the relevant record in the list.
Modify a Prescription
There are two ways to modify a prescription:
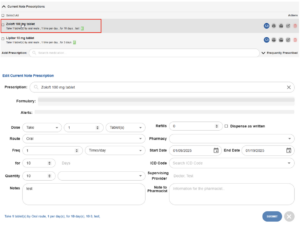
• Click the prescription’s name to open the Edit Current Note Prescription window to modify. Click Submit to save changes.
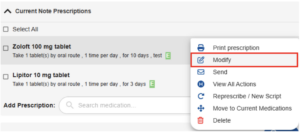
• Another way is to do a right-click on the prescription and select Modify.
View Interaction Alerts, Formulary, and Dosing Information
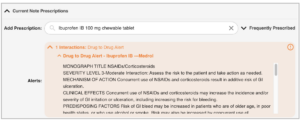
When adding a prescription, as soon as you select a medication, Interaction Alerts will be triggered such as Drug to Drug, Drug to Condition, Drug to Allergy, Drug to Age and Dosage Alert will be displayed.
Drug interactions are color-coded based on the alert level type.
You can also view the summary of the patient’s vitals and demographics that have a significant impact on how dosing can be created for the patient.
The indications, the dose type, the daily and maximum dose thresholds, frequency, duration, and more are listed in the Dosing table.

Send a Prescription
There are two ways to send a prescription:
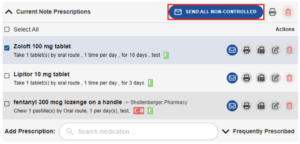
- From the Current Note Prescriptions, select the prescription to be sent then click the Send icon to the right.

- Another way is to select the prescription then click either the Send All Controlled / Non-Controlled button.
Send Multiple Prescriptions
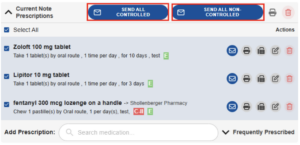
1. To send multiple prescriptions, tick off the checkboxes of the selected prescriptions. You can also tick off the Select All checkbox to send all prescriptions on the list.
2. Click the Send All Controlled button for controlled prescriptions and click the Send All Non-Controlled for non-controlled prescriptions.
Send or Print Counsel(s)
To print or send a counsel for a single or multiple prescriptions:
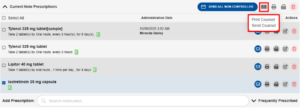
1. From the list of Current Note Prescriptions, select the applicable prescriptions.
2. Click the Print and Send Counsel symbol , and then select between Print or Send Counsel.
Print Prescription:
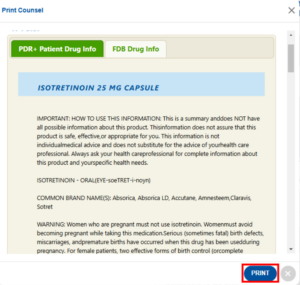
3. When selecting Print Counsel, review the drug info and then click Print.
Send Prescription:
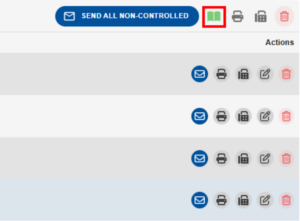
4. The Print and Send Counsel symbol turns green to indicate that the counsel has been sent.
Print Prescription(s)
Print a Single Prescription
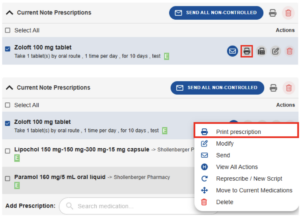
There are two ways to print a prescription:
- Select the prescription and click the Print icon .
- Another way is to do a right-click action on the prescription then select Print Prescription.
Print Multiple Prescriptions
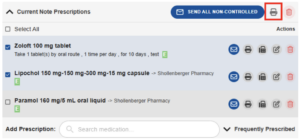
To print multiple prescriptions, tick off checkboxes of the selected prescriptions then click the bulk Print icon at the upper-right corner of the tab/section.
Fax a Prescription

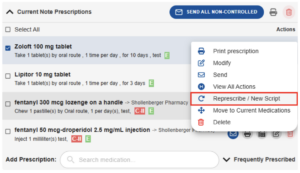
Represcribe/ New Script
Move a Prescription to Current Medications
View the Prescription Status
Once the prescription request is sent, the symbols to the right of the medication name change based on the status of the request.
The following are the status symbols:
Delete a Prescription
There are two ways to delete prescription in Current Note Prescriptions:
- For a single record, click the Delete icon on each prescription.
- Another way is to do a right-click action and select Delete.
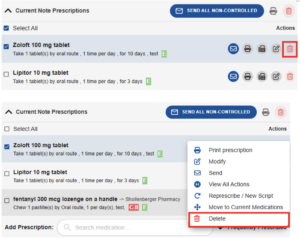
A pop up window is triggered and requires a user to confirm action. If confirmed, click the Delete button.

Delete Multiple Prescriptions
To delete multiple prescriptions, tick off the checkboxes of the prescriptions then click the bulk Delete icon on the upper-right corner of the tab/section.
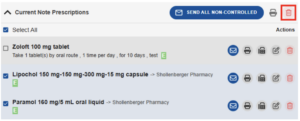
A pop up window is triggered and requires a user to confirm action. If confirmed, click the Delete button.

B. Current Medications
This section lists the medications the patient is currently taking.
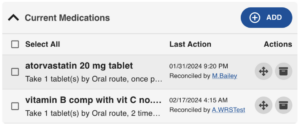
The Last Action column displays details such as the date, time, and user who performed the last action.
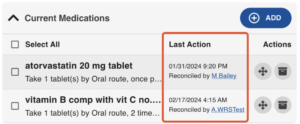
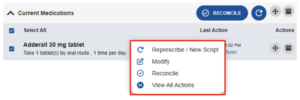
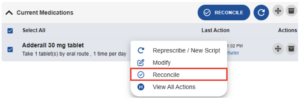
Hover on the medication to view the details and do the right-click action to view option menu such as Represcribe/New Script, Modify, Reconcile, and View All Actions.
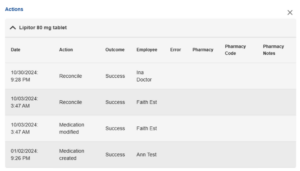
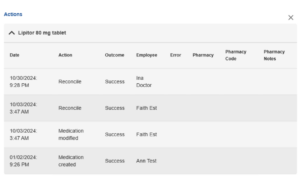
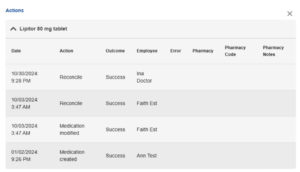
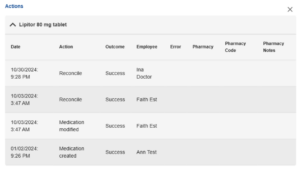
Select View All Actions to open the Actions window where you can view the date, actions, outcome, the user who performed the action along with pharmacy details and notes.
Add a Current Medication
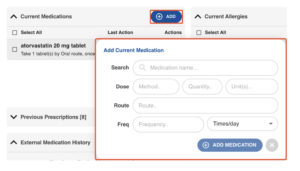
Click the ADD button to open the Add Current Medications window where you can add a medication to the patient’s current medication list.
Reconcile a Current Medication
The bulk RECONCILE button appears when you select a medication. Click to reconcile.

You can also right-click on the medication, and then select Reconcile.
Modify a Current Medication
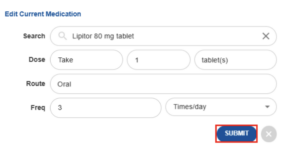
To edit a current medication, right-click on the medication, and then click Modify.

Make changes then click Submit.
Represcribe a Current Medication
To represcribe multiple medications, tick off the checkboxes for the selected medications then click the bulk Represcribe icon .

You can do a right-click action on a medication to represcribe individually then select Represcribe/ New Script.

C. Previous Prescriptions
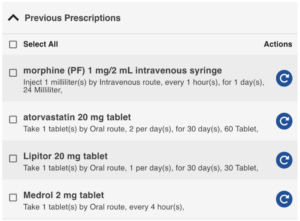
A list of prescriptions previously written by the practice (medications in the Current Note Prescription list are added to the Previously Prescribed list once a new note is created). These prescriptions are from practices using WRS Health.
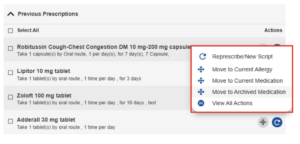
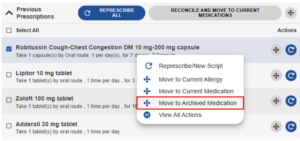
On a record, do a right-click action to select the option menu such as Represcribe/ New Script, Move to Current Allergy, Move to Current Medication, Move to Archived Medication, and View All Actions.
The View All Actions to open the Actions window where you can view the date, actions, outcome, the user who performed the action along with pharmacy details and notes.
Represcribe a Previous Prescription
1. There are two ways to represcribe a previous prescription for a single record:
- Click the Represcribe icon to the right of the prescription.
- Right-click on the prescription, and select Represcribe/ New Script from the option menu.
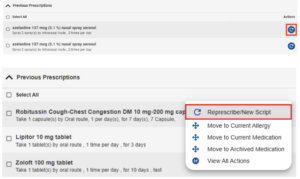
Note: If you represcribe a previous prescription that triggers alerts, Interaction Alerts will be displayed so as Formulary and Dosing Advice if available.

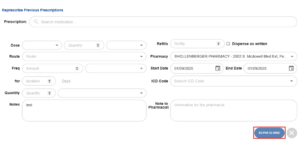
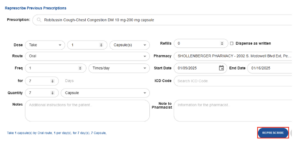
2. In the Represcribe Previous Prescription window, data from the record will carry over/prepopulate if available, make changes if applicable then click Represcribe.
The new prescription will now be displayed in the Current Note Prescriptions lists.
Represcribe Multiple Previous Prescription
There are multiple ways to resprescribe multiple previous prescriptions:
- Tick off the checkboxes for selected previous prescriptions then click the bulk Represcribe icon.
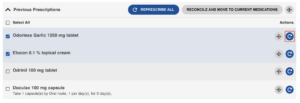
- Another way is to tick off the checkboxes for the previous prescriptions then right-click and select Represcribe/ New Script.
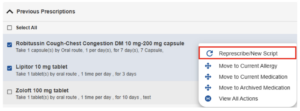
- You can also tick off Select All then click the Resprescribe All button.

Manage Previous Medications
Reconcile and Move to Current Medications
To move and reconcile a previous prescription to Current Medications, tick off checkboxes of the selected prescriptions then click the Reconcile and Move to Current Medications button. Last Action column would show the date, time and name of the user.

Move to Current Medications
There are two ways to move a previous prescription to Current Medications:
1. Select a previous prescription, then use the Drag & Drop icon to move the item to the Current Medications tab/section. Use the bulk Drag & Drop icon to move multiple records.
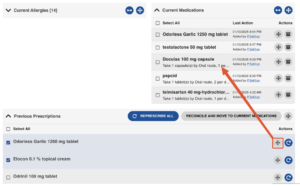
2. Another way is to do a right-click on the previous prescription, then select Move to Current Medication.
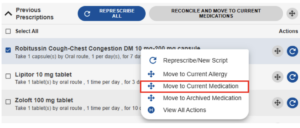
Move to Archived Medications
There are two ways to move previous prescriptions to Archived Medications:
- Select the previous prescription, then use the Drag & Drop icon to move the record to the Archived Medications tab/section. Use the bulk Drag & Drop icon to move multiple records.
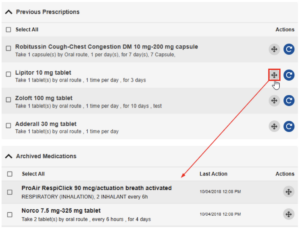
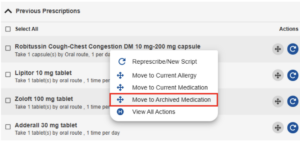
- Another way is to do a right-click on the previous prescription, then select Move to Archived Medication.
D. Current Allergies
This section contains the current allergies declared by and recorded for the patient.
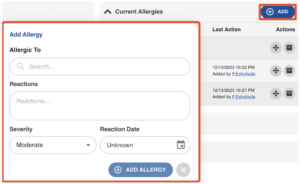
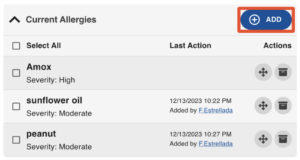
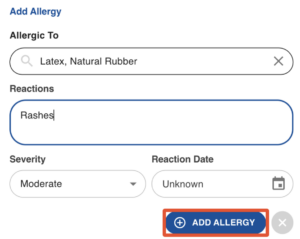
Click the ADD button to open the Add Allergy window where you can add an allergy record for the patient.
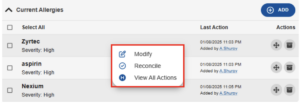
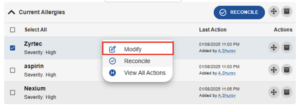
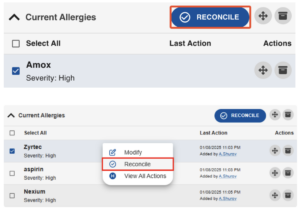
Right-click on the selected allergy to open the option menu such as Modify, Reconcile, and View All Actions.
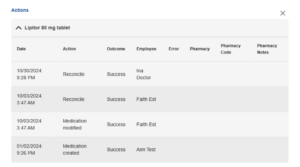
The View All Actions opens the Actions window where you can view the date, actions, outcome, the user who performed the action along with pharmacy details and notes.
Add an Allergy
1. In the Current Allergies tab/section, click the ADD button at the upper-right corner.
2. Enter the allergy information, then click ADD ALLERGY.
You can view the allergy details such as the date, time, and user who added the allergy in the Last Action column.
Modify an Allergy
1. To modify an allergy and its details, right-click and select Modify.
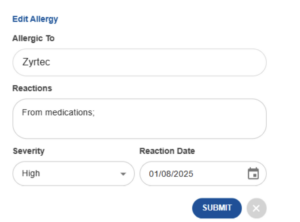
2. In the Edit Allergy window, make the necessary changes, then click Submit.
Reconcile an Allergy
There are two ways to reconcile an allergy:
- The bulk RECONCILE button is triggered when multiple allergies are selected. Tick off checkboxes of allergies, then click the bulk RECONCILE button.
- Another way is to do a right-click action to reconcile individually. Then select Reconcile.
Archive an Allergy
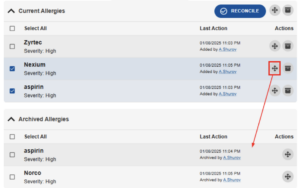
To move a current allergy to the Archived Allergies tab/section, use the Drag & Drop icon to move individual records to the Archived Allergies tab/section. Use the bulk Drag & Drop icon to move multiple records to the Archived Allergies tab/section.
E. Archived Medications
This contains the list of medications and allergies that are archived by providers.

Right-click to View All Actions to open the Actions window where you can view the date, actions, outcome, the user who performed the action along with pharmacy details and notes.
Archive Medications
Archive Current Medications
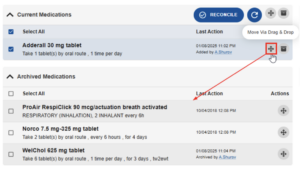
To archive current medications, use the Drag & Drop icon on the selected medication, then drag and drop the record to the Archived Medications tab/section.
Archive Previous Prescriptions
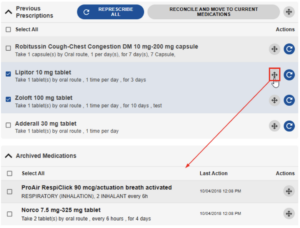
There are two ways to archive previous prescriptions:
- Use the Drag & Drop icon to move individual records to the Archived Medications tab/section. Use the bulk Drag & Drop icon to move multiple records.
- Another way is to do a right-click action on the selected records then select Move to Archived Medication.
Note: Only prescriptions with Sent and Received status can be moved to Archived Medications via the Drag and Drop method.
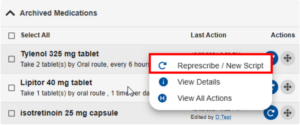
View the details such as the date, time, and the user who archived the medication in the Last Action column.
Represcribe Archived Medications
To represcribe an archived medication:
1. Right-click on the item, and then select Represcribe/New Script.
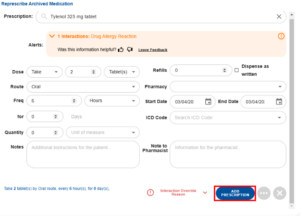
2. Enter the necessary details, and then click Add Prescription.
Represcribe Multiple Archived Medications
To represcribe multiple archived medications:
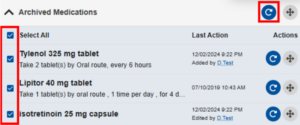
1. Select the corresponding checkboxes of the medications you want to represcribe, and then click the Represcribe button.
Administer Medication or Dispense a Sample from Archived Medications
To administer a medication or dispense a sample of an archived medication:
1. Right-click on the item, and then select Represcribe/New Script.
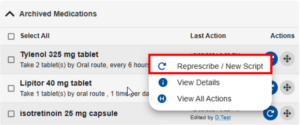
2. Enter the necessary details, and then click the button to the right of the Add Prescription button.
3. Select Dispense Sample to dispense a sample, or Administer Medication if you are administering the medication to the patient.

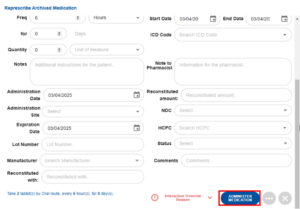
4. Enter the additional necessary details and then click Dispense a Sample or Administer Medication accordingly.
F. Archived Allergies
This contains the list of allergies that are archived by providers.
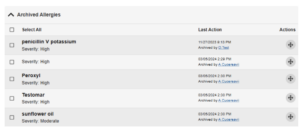
Right-click to View All Actions to open the Actions window where you can view the date, actions, outcome, the user who performed the action along with pharmacy details and notes.
G. Medication Transactions
This lists the history of medications that were recorded and included as part of the patient record enabling providers to see the drugs that have been previously prescribed.
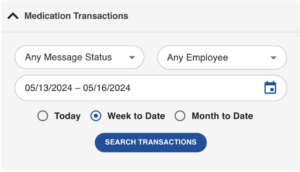
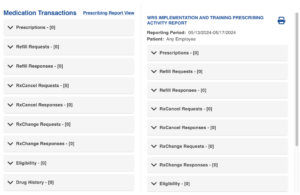
The Medication Transactions lists the transactions based on your selected search criteria and sorts them according to transaction type such as Prescriptions, Refill Requests, Refill Responses, etc.
You can also view the medication transactions in the Prescribing Report View where you can find the option to print the report.
Archive Medications
To view the medication transactions, follow these steps:
1. Go to the Medication Transactions section.
The section is collapsed by default. Click the expand arrow to open and view the section.
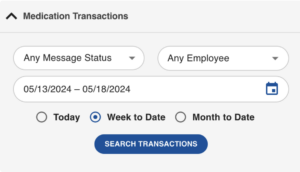
2. In the transaction details, enter the applicable filter criteria such as the status, employee, and date, and then click SEARCH TRANSACTIONS.
The lists are filled out depending on the default presets.
H. External Medication History
In this section, click GET MEDICATION HISTORY to retrieve a list of medications that the patient has taken in the past. This information may be obtained via the health plan, PBM (Pharmacy Benefit Management), or pharmacy. This information is obtained through Surescripts.
Note: Access to External Medication History requires the patient’s consent and eligibility.

View External Medication History
1. To view the patient’s external medication history, go to the External Medication History section.
2. In the External Medication History section, click GET MEDICATION HISTORY.

Note:
External Medication History is similar to Drug History from the previous Medications page.
You can represcribe external medications.
The system automatically generates a report for a patient’s medication history overnight if they have an appointment the following day. An electronically signed Drug Consent (accessible in Patient Management > Directives) and PBM Data are the prerequisites to automatically generate this report.
I. Deleted Medications
In this section, all the deleted medications are listed.
In the Last Action column, the user who performed the deletion is identified along with the time and date when the medication is deleted.
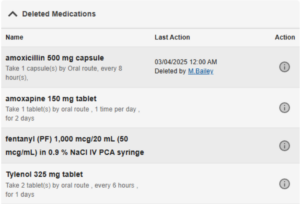
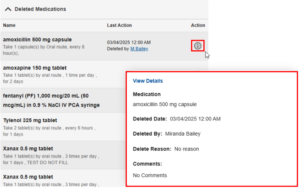
Click the Action tooltip to view the details of the deleted medication.
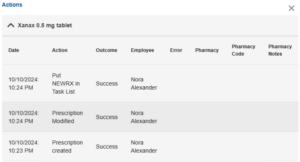
Right-click to View All Actions to open the Actions window where you can view the date, actions, outcome, the user who performed the action along with pharmacy details and notes.
View External Medication History
Represcribe
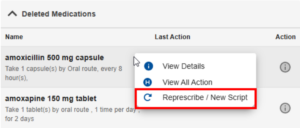
1. To represcribe a deleted medication, right-click on the item, and then select Represcribe/New Script.
2. Enter the necessary details, and then click Add Prescription.
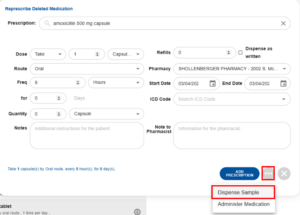
Dispense a Sample
1. To dispense a sample of a deleted medication, right-click on the item, and then select Represcribe/New Script.
2. Enter the necessary details, and then click the button to the right of the Add Prescription button.
3. Select Dispense Sample.
4. Enter the additional information, and then click Dispense Sample.
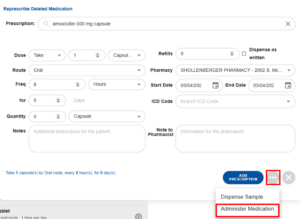
Administer Medication
1. To administer a deleted medication, right-click on the item, and then select Represcribe/New Script.
2. Enter the necessary details, and then click the button to the right of the Add Prescription button.
3. Select Administer Medication.
4. Enter the additional information, and then click Administer Medication.

Still no luck? We can help!
Contact us and we'll get back to you as soon as possible.
Submit a Request


